Android——一次选取本地相册多张图片
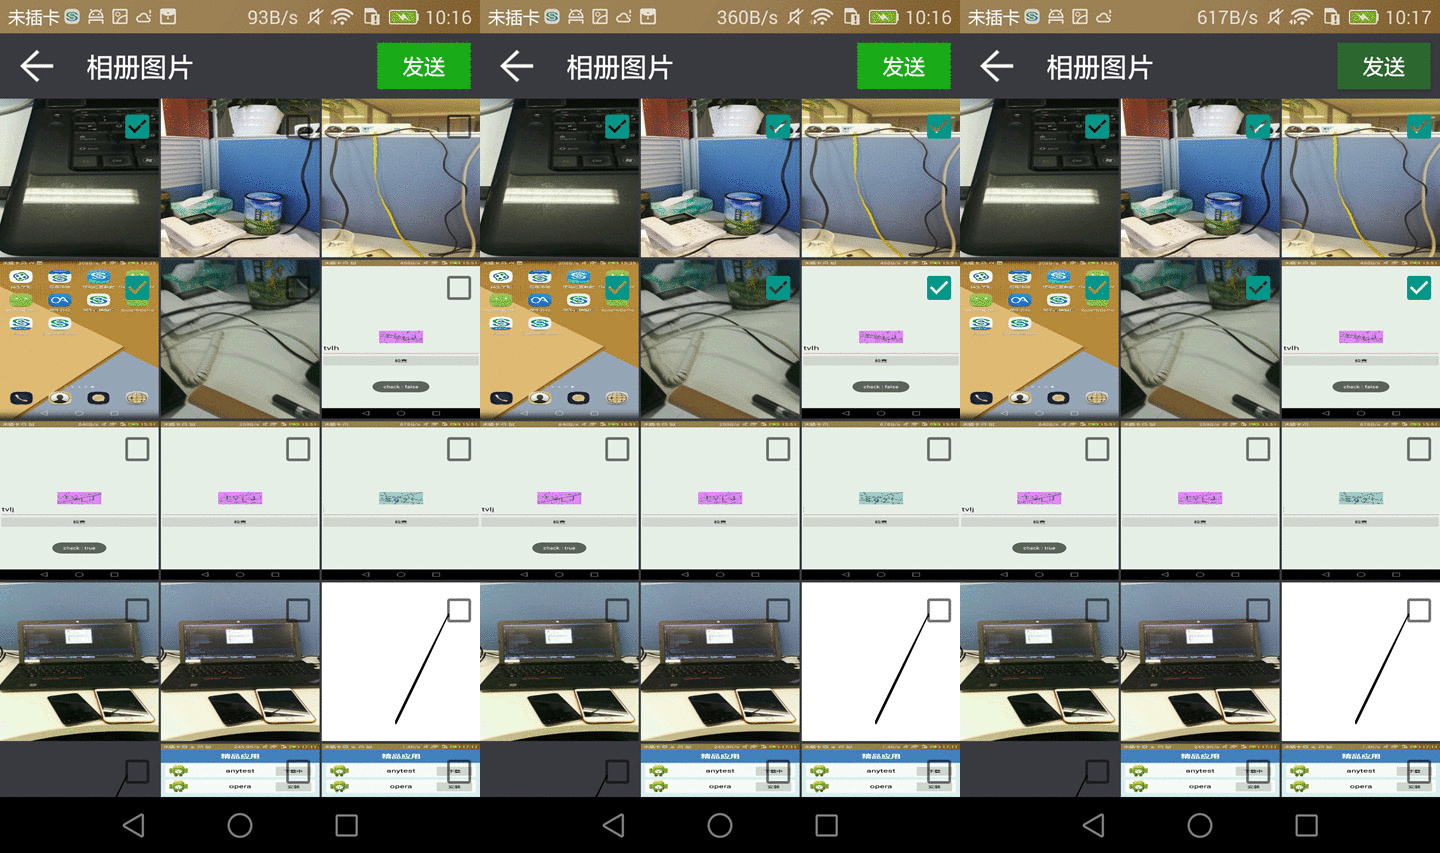
由于项目需求,需要上传一些图片信息到服务器,以前的方案是采用H5标签,但是只能一次选择一张图片,不太方便,需要一次选择多张图片上传,采用的方案是使用ContentResolver查询本地相册图片信息,然后采用GridView(ImageView+CheckBox)进行展示,同时,采用MVP模式进行开发,下面是效果图:

首先是模型类(M):
public class PhotoItem implements Parcelable {
    public String id;
    public String path;
    public boolean isChecked = false;
    public PhotoItem() {
    }
    public PhotoItem(String id, String path) {
        this.id = id;
        this.path = path;
    }
    @Override
    public int describeContents() {
        return 0;
    }
    @Override
    public void writeToParcel(Parcel dest, int flags) {
        dest.writeString(this.id);
        dest.writeString(this.path);
        dest.writeByte(this.isChecked ? (byte) 1 : (byte) 0);
    }
    protected PhotoItem(Parcel in) {
        this.id = in.readString();
        this.path = in.readString();
        this.isChecked = in.readByte() != 0;
    }
    public static final Parcelable.Creator<PhotoItem> CREATOR = new Parcelable.Creator<PhotoItem>() {
        @Override
        public PhotoItem createFromParcel(Parcel source) {
            return new PhotoItem(source);
        }
        @Override
        public PhotoItem[] newArray(int size) {
            return new PhotoItem[size];
        }
    };
}
上传图片需要图片文件路径,同时需要要id去区别不同的图片,isChecked表示图片是否被选中上传。需要实现序列化接口,便于不同Activity之间的传递。
然后是View类,主要是PhotoPickActivity和IPhotoPickActivity接口,IPhotoPickActivity主要有四个方法:
public interface IPhotoPickActivity {
    void showDialog();
    void hideDialog();
    void showErrorMessage(String errorMsg);
    void showPhotos(List<PhotoItem> photoItems);
}
分别为显示加载Dialog、隐藏加载Dialog、显示错误信息以及显示从相册中查询到的照片。PhotoPickActivity需要实现这个接口。
PhotoPickActivity的布局如下:
<?xml version="1.0" encoding="utf-8"?>
<LinearLayout
    xmlns:android="http://schemas.android.com/apk/res/android"
    android:layout_width="match_parent"
    android:layout_height="match_parent"
    android:background="#393A3F"
    android:orientation="vertical">
    <RelativeLayout
        android:layout_width="match_parent"
        android:layout_height="wrap_content">
        <ImageButton
            android:id="@+id/btn_back"
            android:layout_width="wrap_content"
            android:layout_height="wrap_content"
            android:layout_alignParentLeft="true"
            android:layout_centerVertical="true"
            android:layout_marginLeft="10dp"
            android:background="@drawable/btn_back_icon"/>
        <TextView
            android:id="@+id/tv_title"
            android:layout_width="wrap_content"
            android:layout_height="wrap_content"
            android:layout_centerVertical="true"
            android:layout_marginBottom="10dp"
            android:layout_marginLeft="20dp"
            android:layout_marginTop="10dp"
            android:layout_toRightOf="@+id/btn_back"
            android:text="相册图片"
            android:textColor="@color/white"
            android:textSize="20sp"/>
        <Button
            android:id="@+id/btn_send_photo"
            android:layout_width="70dp"
            android:layout_height="35dp"
            android:layout_alignParentRight="true"
            android:layout_margin="7dp"
            android:background="@drawable/btn_green_selector"
            android:text="发送"
            android:textColor="@color/white"
            android:textSize="16sp"/>
    </RelativeLayout>
    <GridView
        android:id="@+id/gdv_photo"
        android:layout_width="match_parent"
        android:layout_height="match_parent"
        android:horizontalSpacing="2dp"
        android:numColumns="3"
        android:stretchMode="columnWidth"
        android:verticalSpacing="2dp"/>
</LinearLayout>
主要为上面一个TitleBar加下面一个GridView。
业务逻辑类为PhotoBiz,在其中是查询相册信息,使用ContentResolver,查询的URI为: MediaStore.Images.Media.EXTERNAL_CONTENT_URI,在使用之前需要判断外置存储是否存在,查询出的结果按照拍摄时间降序排列:
public class PhotoBiz {
    private Context mContext;
    public PhotoBiz(@NonNull Context context) {
        mContext = context;
    }
    public List<PhotoItem> getPhotoItems() {
        List<PhotoItem> items = new ArrayList<PhotoItem>();
        if (Environment.MEDIA_MOUNTED.equals(Environment.getExternalStorageState()) && !Environment.isExternalStorageRemovable()) {
            ContentResolver contentResolver = mContext.getContentResolver();
            Uri uri = MediaStore.Images.Media.EXTERNAL_CONTENT_URI;
            //根据拍摄时间降序排列
            Cursor cursor = contentResolver.query(uri, null, null, null, MediaStore.Images.Media.DATE_TAKEN + " DESC");
            if (cursor != null) {
                while (cursor.moveToNext()) {
                    String id = cursor.getString(cursor.getColumnIndex(MediaStore.Images.Media._ID));
                    String data = cursor.getString(cursor.getColumnIndex(MediaStore.Images.Media.DATA));
                    PhotoItem photoItem = new PhotoItem(id, data);
                    items.add(photoItem);
                }
            }
        }
        return items;
    }
}
PhotoPickPresenter为展示类(P),主要是关联业务逻辑类和View,如下:
public class PhotoPickPresenter {
    private Context mContext;
    private IPhotoPickActivity mIPhotoPickActivity;
    private PhotoBiz mPhotoBiz;
    private static final int MSG_GET_PHOTOS_SUC = 1;
    private static final int MSG_GET_PHOTOS_ERROR = -1;
    private List<PhotoItem> mPhotoItems;
    private Handler mHandler = new Handler() {
        @Override
        public void handleMessage(Message msg) {
            switch (msg.what) {
                case MSG_GET_PHOTOS_ERROR:
                    mIPhotoPickActivity.hideDialog();
                    String errorMsg = (String) msg.obj;
                    mIPhotoPickActivity.showErrorMessage(errorMsg);
                    break;
                case MSG_GET_PHOTOS_SUC:
                    mIPhotoPickActivity.hideDialog();
                    mIPhotoPickActivity.showPhotos(mPhotoItems);
                    break;
            }
        }
    };
    public PhotoPickPresenter(Context context, IPhotoPickActivity iPhotoPickActivity) {
        mContext = context;
        mIPhotoPickActivity = iPhotoPickActivity;
        mPhotoBiz = new PhotoBiz(context);
    }
    public void getData() {
        mIPhotoPickActivity.showDialog();
        ThreadPoolManager.getInstance().getThreadPool().execute(new Thread(new Runnable() {
            @Override
            public void run() {
                mPhotoItems = mPhotoBiz.getPhotoItems();
                if (mPhotoItems == null || mPhotoItems.size() == 0) {
                    Message message = Message.obtain();
                    message.what = MSG_GET_PHOTOS_ERROR;
                    message.obj = "无法获取用户相册图片信息!";
                    mHandler.sendMessage(message);
                } else {
                    mHandler.sendEmptyMessage(MSG_GET_PHOTOS_SUC);
                }
            }
        }));
    }
}
需要注意的问题:
1、GridView每个Item宽度的问题? 采用三等分,由于设置了每个Item之间的间隔为2dp,因此,计算如下:
a.首先获取屏幕宽度screenWidth,单位为像素‘
b.itemsize = (screenWidth - (2 * density + 0.5f )) / 3,其中density为屏幕密度,为屏幕dpi/160,获取方法如下:
context.getApplicationContext().getResources().getDisplayMetrics().density;
c.动态设置宽度和高度:
final AbsListView.LayoutParams params = new AbsListView.LayoutParams(mPhotoSize, mPhotoSize);
convertView.setLayoutParams(params);
2、GridView复用convertView导致CheckBox错乱的问题? 使用PhotoItem的isChecked去标识对应的CheckBox是否被选中,在设置OnCheckedChangeListener之后,根据PhotoItem的isChecked标识从新设置CheckBox的选中状态:
viewHolder.mCheckBox.setOnCheckedChangeListener(new CompoundButton.OnCheckedChangeListener() {
    @Override
    public void onCheckedChanged(CompoundButton buttonView, boolean isChecked) {
        photoItem.isChecked = isChecked;
    }
});
viewHolder.mCheckBox.setChecked(photoItem.isChecked);
3.动态设置convertView导致GridView第一个Item无法响应? 解决方案:在convertView第一次初始化时(在if之内设置),动态设置convertView的宽度和高度,而不是每次都设置:
if (convertView == null) {
        convertView = LayoutInflater.from(mContext).inflate(R.layout.item_photo, null);
        //要在这里进行设置,不然每次都会动态的设置convertView宽高,导致第一个item无法响应或点击
        final AbsListView.LayoutParams params = new AbsListView.LayoutParams(mPhotoSize, mPhotoSize);
        convertView.setLayoutParams(params);
        viewHolder = new ViewHolder();
        viewHolder.mImageView = (ImageView) convertView.findViewById(R.id.iv_photo);
        viewHolder.mCheckBox = (CheckBox) convertView.findViewById(R.id.cb_photo);
        convertView.setTag(viewHolder);
}